How do I use an API node?
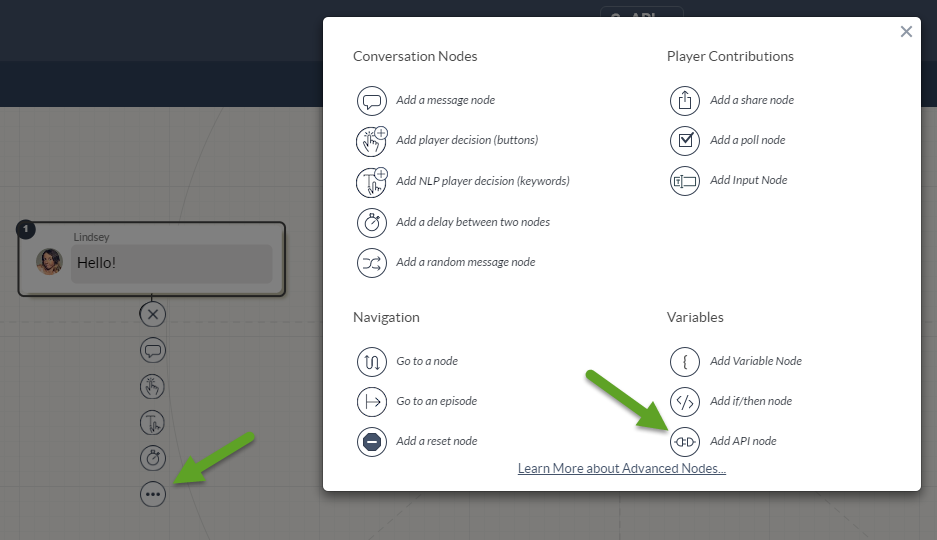
Click on the Advanced tool icon under an existing node. Then click on the "Add API Node" icon:
Onsequel’s "API Node" supports RESTful API calls.
A RESTful API is an application program interface (API) that uses HTTP requests to GET, PUT, POST and DELETE data from third party servers. You can find unlimited resources on RESTful API on the internet.
You can make GET, POST, PUT, DELETE, PATCH and HEAD requests using the API Node.
Here are the steps on how to use an API Node to make RESTful API calls:
1. MAKING API REQUEST
GET Request:
To make a GET request, type the API URL in the base url field of the node. Query parameters can be added to the request parameters section as key value pairs which will be added to the request query while making the request.
Select GET HTTP method in the next section, and click the "TEST API REQUEST" button to make the request.
POST Request:
To make a POST request, type the API URL in the base url field of the node. Select the HTTP method as POST. Depending on the body format supported by the API provider, choose either "form-data" or "raw body” accordingly.
- For "form-data", enter the request parameters in the next section which will be sent as a key value pair in the request body.
- For "raw body", you can send custom body to the POST request depending on the API requirement (this will be specified in your API documentation). Select the request type in the next section, namely text/plain, application/json, application/javascript, application/xml and text/xml.

In the next section, type in your body formatted in the above selected format, and click the "TEST API REQUEST" button to make the request. Similarly, the other HTTP request could also be made.
Advanced API Options:
Custom Headers:
The API node supports advanced options like adding custom headers to the request, adding authentication to the request by adding secure signature to the request.
To add custom headers to the request, enter the headers in the custom headers section as key value pair. They will be added to the request headers while making the request.
a) Adding Authentication:
The API node supports basic authentication. Add the basic auth username and password. Proper authentication header for basic authentication will be added to the request while making the request. (More authentication options are coming soon.)

b) Securing the API Request:
If an API request requires the secure call, you can also add the secure signature key in the request. Different API providers implement different methods and algorithms to generate the secure signature. We’ve tried to make the process as simple and generic as possible.
You can define the hashing algorithm to be used to generate the signature, the location to send the signature key in Query parameters, headers or request body which is used to sort the request parameters before generating the signature and what part of the url to be included in the raw signature string, etc.
Send Webhook Data:
This is used for the Webhook Startnode and is explained in the Webhook Start node section.
2. PROCESSING THE REQUEST RESPONSE
In order to use the status code in your bot, the response code can be stored in a variable. The response format will be shown in the response format section depending on the response returned by the API.
The Full response can be seen by clicking the "see full response" link.
If the response is plain text, there will be a variable drop-down where you can select the variable to store the text response. For xml or json response formats, you can extract the desired node using xpath or jsonpath respectively. The Extracted strings could be stored in variables and can be used in the bot.
The screenshot below shows how to extract a json value from json using jsonpath:

For Xpath refer http://www.w3schools.com/xsl/xpath_intro.asp
For Jsonpath refer https://github.com/jayway/JsonPath
Using Variables in the API:
If you are using variable parameters in your request (E.g.: userId, orderId, etc), you can store them in variables anywhere prior to the API node, and then use them in the API node to make the call. Variables can be used in the url, request body, request parameters, headers etc. Their values will be replaced with the values stored in the variables while making the request.
Customer support service by UserEcho